
Here's some more shots of things in progress. I did finally land a CoCo 3 to use the board out of for the GloCo, since I trashed the original one trying to unass the 6809. True, I'll probably trash this one too, but I got it cheap, so... Okay, let's keep our fingers crossed I can get the job done. While we're at it we'll do a quick CoCo 3 break down. And fire it up to make sure everything works.
 For those that already know all this stuff, skip it. Just haven't done a break down article in a long time, so figured since I had the pics, I'd run one. Not a lot of detail here, but the point is to encourage more folks to take the plunge.
First step is to remove all the screws from the bottom of the case. One of them is located under the warranty seal. Punch right through and pop that sucker's cherry.
 It helps to turn the case on it's side like this while you're unscrewing the screws. Do one screw at a time and dump it into your hand. A magnetic screwdriver will also work, if you prefer. (You can do it with a regular screwdriver. Just give a sharp smack on the edge of your work bench. It'll magnetize the crap out of it. Consider that you'll need an electro-magnetic coil or demagnetizer to return it to normal.)
 After dumping the screws out, save them in a safe place. Dixie cups work nice, those little electronics tubes are handy, or put 'em in an envelope. You'll also want to note that the front screws are shorter than the back screws. But sure to use the right ones in the right place when reassembling.
That screw driver, by the way, is probably the best powered one I've ever owned. It's a Kobalt Lithium-Ion little guy I picked up at Lowe's. It's light, comfy and has just the right amount of torque. Not enough to strip the threads, but just enough to loosen most normal screws. And runs for a long time on a single charge so, unlike many cordless tools that are only good for short projects, you can use this screwdriver a lot. Very nice, highly recommended.
 This board was pretty clean, but dusty. A little canned air takes care of that nicely. This is Velocity brand from Radio Shack. You can get canned air cheaper if you shop around a bit, but hey, I was there. Thing about canned air is, if the outside says it won't cause condensation or leak water, it's a) full of shit and b) full of shit. Use it in short bursts and don't tip it more than 30 or 40 degrees, or it'll wet itself.
 Here's another one of those easy but do it slow and steady operations. Remove the flat keyboard cable by lifting the keyboard up, off it's posts, and down a little. Then gently pull the cable out of the socket. They stick a bit sometimes, so use two hands and wiggle it just a smidgen, if needed. The plastic cable is fairly tough, but it will rip if mishandled.
 Then unplug the power transformer from the board. You might need to use a flathead screwdriver to very gently pull back on the clip that holds the plug in.
The rest is pretty straight forward. Remove all the screws holding the main board down. There's two over by the pak slot that have to come out and two little brackets you'll want to save. Also note that there are two copper clips at the bottom of the board. These being the keyboard grounds. You'll want to keep those as well. The transformer has two screws holding it down. Just be sure to grab and lift it low cause the top cage will come off when you lift. I didn't take pictures of all this on account I figure we've already got enough pictures of me unscrewing things.
 For now, I've installed the original CoCo power transformer in the GloCo. This will do until I get up the guts to convert it to the PC power supply. Still not entirely clear on how that works, but we'll throw the whole thing off that bridge when we get to it. There's actually nothing wrong with the CoCo's transformer, it just won't power anything else (easily).
 Here it is all put together. Step the next is easy. Install the 512K upgrade board. The step after that is not too easy. Upgrade the microprocessor. Looking forward to giving it another try, though. I learned a lot in the last attempt, and have since gotten a few more pointers from some clever folks that actually know what they're doing, so I'm cautiously optimistic. :)
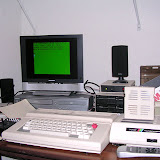
 Here it is up and running. This was actually an important test, because I needed to know if the fan, power boxes, and lights would cause any interference. They don't. If they had that would have seriously sucked.
The drives are up and running too, which was the other major accomplishment. They're 5 1/4" 40-track, double sided 360K drives hooked up to a 26-3129 controller. Currently, they're crammed into an old FD-501 case. I'll need to find a Disk BASIC compatible DOS to run them to their full potential temporarily. NitrOS-9 works nicely with them, though. Still can't get the top drive to format or DSKINI, but they do everything else including load, save, copy, backup, etc. That's good enough for now. The goal is to replace the top drive with a 3 1/2" eventually, anyhow.
So, this will probably be the last Pimp My CoCo update on this project for a little while. I'll do another post when the upgrades are in place and running. Though, if anything interesting comes up, I'll post before then. At this point, the goal is to get the thing running so I can start using it. Then we'll house the drives, power supply, VGA adapter and all that other stuff in a nice, painted case. Also need to upgrade an MPI and paint it black for use with this guy as well. Plenty to do, but at least there's some light peeking out at the end of the tunnel. :)
Angel's Luck,
Capt.


No comments:
Post a Comment