
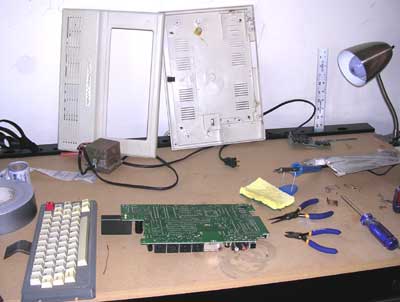
Here's the CoCo completely taken apart. This is a 512K Color Computer 3 with the PBJ RAM upgrade. If you look close you can make out the PCB over there at the back near the ruler and lamp. I bought this CoCo because of this upgrade. It was so beat up, no one else even bid on it, if I remember correctly. heh! The case and keyboard are in pretty bad shape and will require some gnarly restoration. I'm thinking solid black case and keys except the break key.
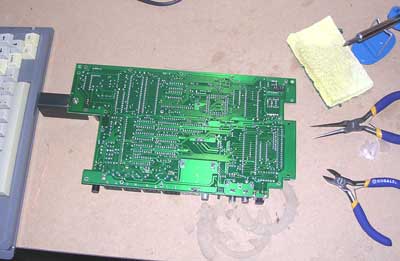 The underside of the CoCo 3 mainboard. The longest vertical row of solder dots off on the bottom right there is the MC68B09EP and the target of my affections at the moment. The bastard. The $2.99 solder iron/solder wick attempt just ain't gonna work. I know, there's a bunch of very smart folks out there shaking their heads and muttering "told ya so." It was worth a shot.
On order from Jameco Electronics is a shiny new eletric solder pump, some of the curly solder cleaner stuff and a stand for the irons. Nothing wrong with the iron, actually. 25W and works great. Sure, if I do this often enough I'll get something nicer, but for one chip, it'll do.
Google has been no help at all. Sigh. I need a source for a Hitachi 6309, if anyone knows a place to snag 'em, drop me a note. :)
Any good project should start with a to do list, so here what I've got so far:
Mods to the Mainboard:
Desolder and socket the 6809.
Identify power needs.
Board (5V), Fans (5V), Light Kit (5V?), Drives (?), MPI (?)
Locate a proper power source.
Install power source.
Built and install power on LEDs under case badge.
Case Mods:
Template the window modification.
Locate appropriate fans for right side and top (something small)
Template the fan modifications.
Modify the case for window and fan mods.
Make a new case badge with clear color dashes for power on LEDs.
Modify case for power on LEDs.
Primer and paint case.
Primer and paint keyboard keys and faceplate.
(Is it possible to remove and change the keyboard faceplate?)
Install window and fans.
Install power on LEDs (make three LED board and hook into PS where?)
Identify light kit.
Install light kit.
Paint the MPI and Drive casings.
All of that should keep me busy for a good long while. Next step is to gather up the stuff I need. I'm thinking a trip to the Shack is in order tomorrow, on account I have almost nothing for eletronics work. Gonna need some cleaner, some flux, some rosin core solder, LEDs, spare common components (I think I have some old resistors and some timer ICs laying about somewhere), a 40-pin IC socket, and anything else I can pick up while I'm there.
While waiting for the desolder pump to arrive, we might as well get started on the case mods. Which means a trip to Lowes this weekend for Dremel tool supplies (I'll be needing some etching and routing bits and standard cutoff wheels... the heavy duty ones I have now aren't proper for the CoCo's plastic case. Think melting. heh!) Also pick up some sort of plexiglass and some window fitting if they have it.
Before then I'll need to locate and decide on which fans to use, on account I'll need the demensions to cut holes for them. Have to remember to get something with mouting brackets and figure away to mount them without unsightly screws sticking out all over. And we'll be needing auto body paint and primer and lint free polishing cloths. We'll get into that later, but the CoCo's case, with it's ridges and bumps, is gonna be a bitch to paint properly. I'm thinking, with the right light kit: solid black. Black case, black cables, black lights, black keys, black drives, black MPI, everything. A CoCo 3 truely suitable for an evil lab. :D
Angel's Luck,
Capt.


No comments:
Post a Comment