
As I've mentioned before, I'm a bit of an idiot-savant when it comes to technical things. Sans the savant part. While I can grasp technical aspects and theory of a device quickly, I have two very big problems that interfere with my ability to execute technical solutions. First, I can't hold numbers in my head. I don't know why. Never have. Can't even remember my own phone number until I've dialed frequently for over a year. Seriously. And second, sitting still for more than 15 minutes is pretty much beyond me. That might have something to do with the copious amounts of coffee I drink. hmmm...
Regardless, I absolutely love technology, mucking about with stuff, knowing how something works, and building things. Sometimes my two big faults are actually pluses. I can't remember numbers well, so I write everything down. So I always have a trail and a plan to follow if I need to go back over something. (I carry a rather packed full and royally messy Dell Pocket PC for a second brain.) I also tend to throw myself into active tasks with abandon and I never ever quit. Might take months, or years, to learn something or complete a project, but it will get done.
So what's this have to do with a memory upgrade for the CoCo? A lot. Making a couple hundred solder connections is something that would take me a long time to do. I'd be up and running around more often than sitting still and getting it done. But installing a memory upgrade on the CoCo is dirt simple. Even someone like me, with little patience at all, can get it done. It's a 15-minute job. 20 minutes if you're slow about it. Perfect for jacked up Starbucks junkies like me. And if I can do it, it's a given that anyone can.
The benefits of performing this upgrade are huge. NitrOS-9 runs better, CoCo Max 3 is easier to use, and the games are WAY cooler. So, even if you're just running your CoCo as a retro game console, upgrading to at least 512K opens up a whole new world of stuff to do with it. If you're building a modern CoCo, it's a bare minimum!
I was going to write an article for the Hut describing how to perform the upgrade, with pictures and everything, but there's no need. I selected the Cloud-9 Tech 512K SIMM upgrade and the included instructions are simple and complete. Follow them step by step and you're done. Easy peasy. So instead of a lengthy article on the web site, here's a run down to demonstrate how easy it is and what to expect, and hopefully to encourage more CoCoists out there to do the deed.
 Here's a shot (click 'em to enlarge) of the Cloud-9 512K SIMM Upgrade package. It's a single satellite board with two 120ns SIMMs plugged into the sockets (also available without SIMMs if you prefer to install your own). It is oriented vertically and plugs into the CoCo 3's white memory connectors located to the left and below the installed memory. Other 512K packages I've seen are oriented horizontally, so if you've got mods inside your CoCo case, make sure everything will fit properly. The package also includes a manual (2 pages) and a CoCo 5 1/4" floppy disk with the memory test program on it.
 Prep and Tools: You'll need a Phillips head screw driver for opening the CoCo case and a pair of micro-clippers. Highly recommended is a IC extractor tool (see below) for pulling the old memory out. You'll also want an anti-static wrist strap. Memory modules tend to be exceedinly sensitive to static. The cheapo one shown here I picked up from Jameco. Make sure it's clipped to something metal and grounded.
UNPLUG EVERYTHING FROM THE COCO AND THE COCO FROM THE ELECTRICITY. :) Unass the CoCo 3's case by removing the screws from the bottom, flip it over, take the top off and pull the keyboard up and down slightly. You don't need to unhook it, but the Cloud-9 memory board's lip has to sit right next to it and it's hard to get to it with the keyboard on the its posts. Just nudge the keyboard down and out of the way a bit.
 Extract the original memory chips carefully. There's a better than average chance that, since they've been in there for over 20 years, they are a bit tight. Very gently pry them out of there. The chip extractor I'm using there is a professional model I pick up at Cyberguys. You can get the kind that clamp onto the chip and pull it up all at once. I like this one because I get more control. My experience with the other kind has been mixed. This is probably the most difficult part of the operation, but only because you need to go slow and careful. Just be gentle so you don't break a socket or bend something.
 Here's I've gotten one of the memory chips out. These should be stored in an anti-static bag, tube or foam to use later, should the need arise. Like I said, this takes the most time. Maybe five minutes being nice and careful. There's not a lot of danger of damaging the CoCo here, but it could be done if you scratch something or pop a solder joint. Gently....
 Once the old memory is out, you snip out two capacitors, C66 and C65 as labeled on the CoCo's motherboard. Some doofus soldered C65 on my CoCo right flush against the board (they're suppose to be raised slightly), so the clippers couldn't get hold of the leads to snip. If this happens, VERY gently wiggle the capacitor back and forth until it breaks off.
 Next, line up the pins on the Cloud-9 board with the sockets on the CoCo's mother board. They're hard to miss, the nice bright white one's to the left and below the original memory. This is a VERY tight fit, so don't force it. Keep pressing firmly until they slide in, constantly checking the pin alignment. If you bend a pin, back off, pull the assembly out and use a pair of micro-pliers to gently bend it back into position. Try again.
 Here's a shot of the upgrade installed and ready to roll. The keyboard fits right back on. This is the Korean built model, so it just sits up on the posts nice and snug. Put the CoCo back together and we're good to go!
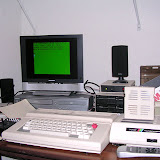
 After everything is back together and plugged in, run the memory test utility on the included floppy. I let it run about 50 times. I also let the CoCo run a graphic demo for about an hour and half. No problems at all and no noticeable increase in heat. Looks good and good to go! :)
That's it. Seriously, 15 to 20 minutes and basic mechanical skills are all you need to do this upgrade. It's cheap and it'll complete change and expand the functionality of your CoCo. The extra memory opens up a whole new world to explore on your CoCo and when it's this easy to do it, there's not a lot of excuse. Do it! :)
Angel's Luck,
Capt.


No comments:
Post a Comment