
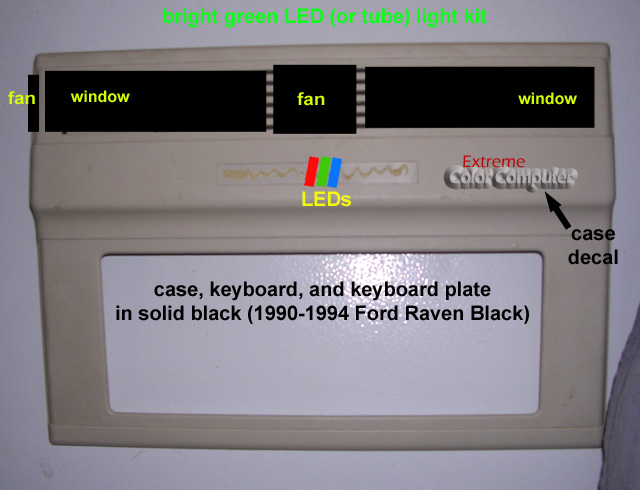
 In the meantime, I did manage to get a little planning done. Digital cameras and photoshop have made building much easier. Sure you can still detail diagram out modifications and designs, and for intricate or complex stuff that's definately the way to go. On the other hand, if you just plan to slap on some paint and cut a few holes, crude overlays in Photoshop work great. This is the initial plan for cutting up the CoCo case.
Two small rectanglular windows on top will bookend an outtake fan in the center. This fan will blow straight up, pulling air out. The second fan will go on the left and be an intake. Cool air in, hot air out This is probably a lot more than is necessary, but I decided not to cut vent holes into the windows (for now), so an outtake fan is a good idea. Plus it'll look cool. :)
The CoCo 3's case is beveled at the top, limiting the window space. We should still get a decent look at the board, but not nearly as much as I'd like. While the flexible plexi I'll be using could be forced into a concave shape, it'd be a bitch to anchor. So for this first time out with the CoCo case, I'll be keeping it to simple flat, square windows. On Random Rodder's suggestion, I'll be gluing the windows into place, thus we won't have any edging eating up viewable room. The thin plastics we'll be working with here make that pretty easy. Haven't decided on the glue/epoxy mix yet.
More than likely, I'll use a single cold cathode light bar instead of an LED array to light the interior. Even with the small windows, it should "glow" nicely. The three slashes are a bit trickier. Cutting them into the CoCo's case may be difficult if I keep them the same size as they were originally on the case badge. Too thick to do accurately with a hobby knife, too small to take a dremel to. Burning them out with a heat knife would work, but would be messy and difficult to control. On the other hand, nothing says I can't make 'em bigger. Those will light up with red, green and blue LEDs on a small PCB and be sperated with dividers glued to the underside of the case. (By the way, blue LEDs are freakin' expensive!)
The decal is obviously just a place holder, but something like that. Easily done on an inkjet with Photoshop and some decal paper.
 I've been looking forward to trying this new paint from Krylon called Fusion but haven't had an opportunity. Well, I'd planned to use autobody touch up paint, but for about $5.00 this is worth a try and considerably cheaper. I love experimenting with new materials and stuff. :) They also have a new H2O brand of acrylic spray on paint. My prefered medium by far. Acrylic is smooth and super tough when dry. For the CoCo's case, though, we'll try the Fusion because it is suppose to bond with the plastic, making it tough and smooth. We'll see, but can't wait to have a go. I chose black satin for the case. The key's will be the same, but will require several top coats after the decals are applied. Painting and putting itty-bitty decals on all the keys should be challenging. (Behind there you can see the plexi I'll be using for the windows and off to the left, nestled in the case is the PBJ 512K upgrade. If I switch boards I'll have to figure out how to do this upgrade to the new one. Yipes!)
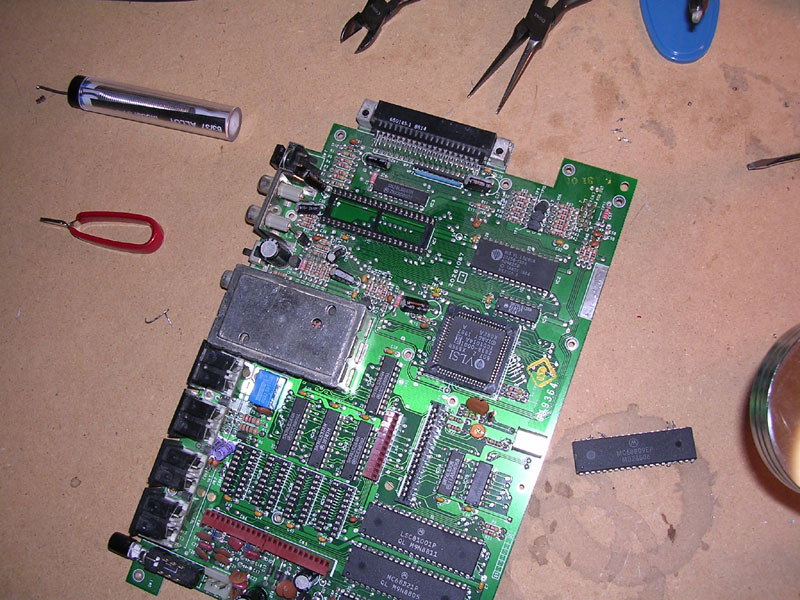 Here's a picture of the 6809 socket. No chip to go in it yet, but soon we'll be able to wire it up and give it a try it. Should look pretty funky with all the wires coming out of it from where I burned the pads off the board. Assuming I get it to work, of course. If not, we'll swap in another board I have and go with the nice, reliable soldered 6809 instead.
Looking at this picture, I also need to get a mat to put down on the work bench. Nice piece of static free carpet or one of those fancy electronics mats or something. Hmmmm.... should have thought of that already.
 And sadly, here's a close up of the mangled 68B09EP. Sigh. Poor guy. Tried to save him, but ended up having to cut it out of there. He's been sitting there quietly doing the job for probably close to 20 years and then some bungling dumbass comes along and rips his brains out. Sheesh. We'll save him for posterity, of course. :)
So, next week I'll try to get the templates done and then start chopping up and preping the case. Also need to locate and decide which fans I'll be using. Something already wired and ready to roll from a PC supply would be nice, but Radio Shack does sell these small fans that would work nicely and be much smaller. It'll be slow going over the next two weeks, but once it's preped up, the rest of the case work should be doable in an afternoon. Of course, with the way I hit SNAFUs, I wouldn't count on it. :)
Angel's Luck,
Cris
 PS If anyone gets a chance, take a look at this drive and let me know if there's anything more I need to do to it (it's a 1024x768 picture). Briza mentioned a terminator chip, but I don't see anything here that indicates such a beast. This is the top drive, Drive 1 in a two drive system. Many thanks.


3 comments:
Hi Captcpu,
Question, Have you tried using a jumper on the jumper point called RDY, This stands for Drive Ready, give it a shot, But I have a feeling that it has to be jumpered to have the drive work, as all my drives have this Jumpered, and all work.
Ps, My sincere condolences for the death of the coco 3 cpu, May it rest in Computer Heaven.
laters
Briza
Hi Captcpu,
\
How did you go putting a jumper on the RDY jumper, did that make any difference, And looking at the other jumpers, leave them alone.
And as for the terminator chip, on the pic, it is located, just behind the connector for the Floppy Ribbon connection(34Pin), That's the terminator chip, it is clear, So I guess you'll need to take a look at the other drive, and see if it has the Terminator connected, If it does, put that at the end of your cable.
laters
Briza
I see... wasn't sure if that came off or not. heh :) Both drives are exactly the same. Nothing plugged in there. hmmm... so where to I find a terminator chip.
Angel's Luck,
Capt
Post a Comment