
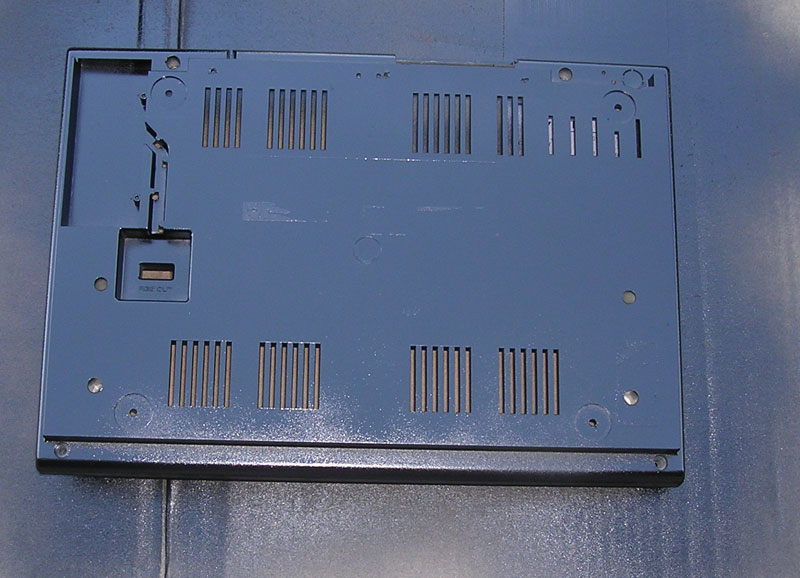
 First, that paint I mentioned before, Krylon Fusion, rocks. It rocks hard. Serious rockage. Here's a picture (forgot to take more of the finished job, but plenty coming soon enough) of one coat on the bottom of the case as a test. Note that I didn't put in a lot of effort to clean up the bottom of the case. Just peeled the stickers off, and scrubbed it down. Not gonna look at the bottom much anyway. heh... More care will be required for the top.
Anyhow, the paint coats quickly and really does bond with plastic. No primer requried! Very swooth and very sweet. If you enlarge this picture and look close, you can make out the RGB connector label, which is molded into the case, clear as day. After three coats and a little drying time, it really looks like it was molded in black plastic originally. Coolness. :) I'll go over painting techniques in a future post when we do the top, but if you've ever used spray paint, you're good. Really doesn't get any easier than this and it's WAY cheaper than auto body paint, but WAY nicer than standard spray on paints.
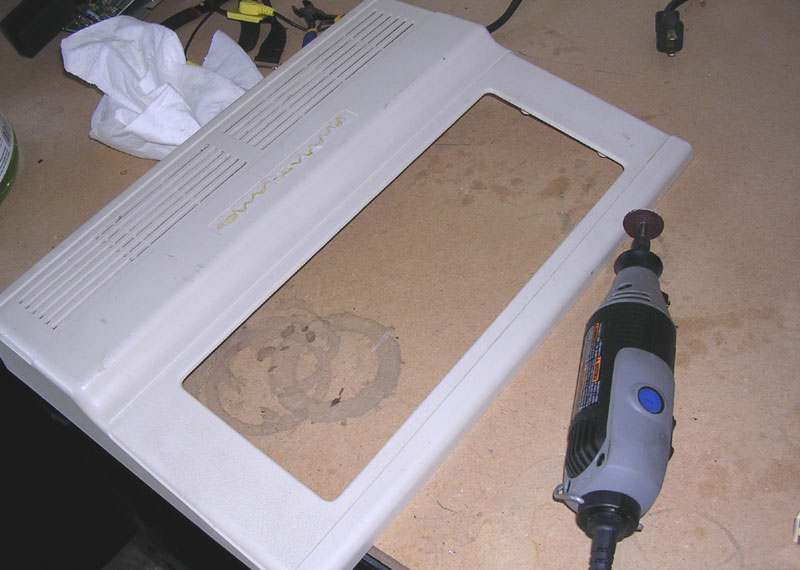 Making a mess is one of the fun parts of building something, and cutting and modifying plastic always makes a nice mess! :) The plastic in the CoCo's case isn't terribly thick, but it's too thick to cut with your average hobby knife. Actually, you can but it makes an even bigger mess and it'll take forever. And since we're all about More Power, let's see what happens when we attack it with a Demel Tool! Bwahahha!
We'll be using a standard cut off wheel, and I recommend the lowest speed setting on the tool. It jumps like a mother. As always, use all manufactuer recommended safetry procautions and equipment, particularly protective eyewear. Hot plastic in the eye is one injury even I won't hazard. ;)
 Sure enough, makes a HELLUVA mess. That garbage shred on top is actually melted plastic. Apparently taking a cutting wheel spinning at 10,000 rpm to your CoCo case will do that. Go figure. :) Okay, seriously, this is a good thing. That the plastic melts when heated means it can easily be molded, cut and shaped. It would be a Bad Thing if it was more heat resistant.
You'll also notice the dimple I cut below the faceplate area. That's from the Dremel shaft where I tried to angle in to get more material. Stupid of me. So that'll have to be filled in. Drat. For the next cuts I'll be using the Flex shaft attachment, or might even try to clamp it down and use the router attachment and a router bit, which would increase accuracy quite a bit.
Should you try to do this, to save you a bit of experimenting, here's what I learned in about 4 seconds after starting. heh. Frist, you can't cut cross ways in a line. The melting plastic starts to cool and the wheel starts to bind, which causes the tool to skip and jump like Starbuck's junkie on free sample day. Just lay the wheel on the area to cut and let it go straight down (it'll go by itself, don't press!). Lift and repeat. Then, trim off the shredded bits with a hobby knife. To remove the rest of the material (the vertical cuts are too narrow in this case), use the Dremel tool to nibble it away bit by bit. Leave a small amount of material around the cut out area. Don't cut completely to where you want to go. Then use a micro file or sanding wheel to take it down to where you want. You'll get smoother results and will require less of what's next.
Of course, even the Dremel tool isn't going to be highly accurate. You can cut thicker plastics with special knives and tools, but not having any we'll use what we've got. So, next we have to use a filler on the edges of the cut and then sand it down to be nice, neat and straight. I chose Milliput (Standard grain) modeling putty from the U.K. This stuff is easy to mold and shape when wet, but sets up to the hardness of stone. Good strong stuff. More important, it sands easily with a simple flat microfile. It's also designed to use with plastic, so it sticks and you can glue stuff to it with model glues and apoxies.
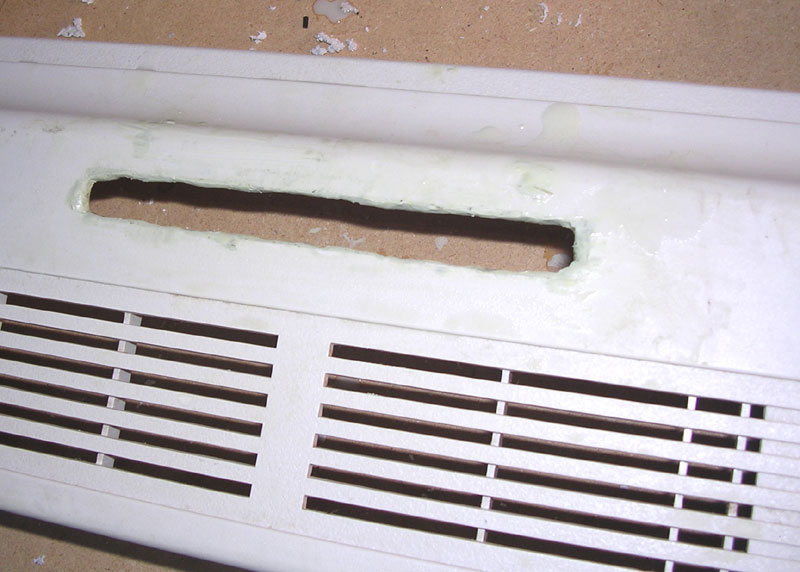 This is the messy part. Milliput is pretty messy. Get's all over when wet. This picture shows where I've backfilled the cut out area. We want to use more than is necessary, a lot more. We're going to file off most of it, becuase the cut is not terribly smooth and all whacky off kilter. When we sand down the Mulliput, it will form a perfectly smooth and level edge. Promise. :)
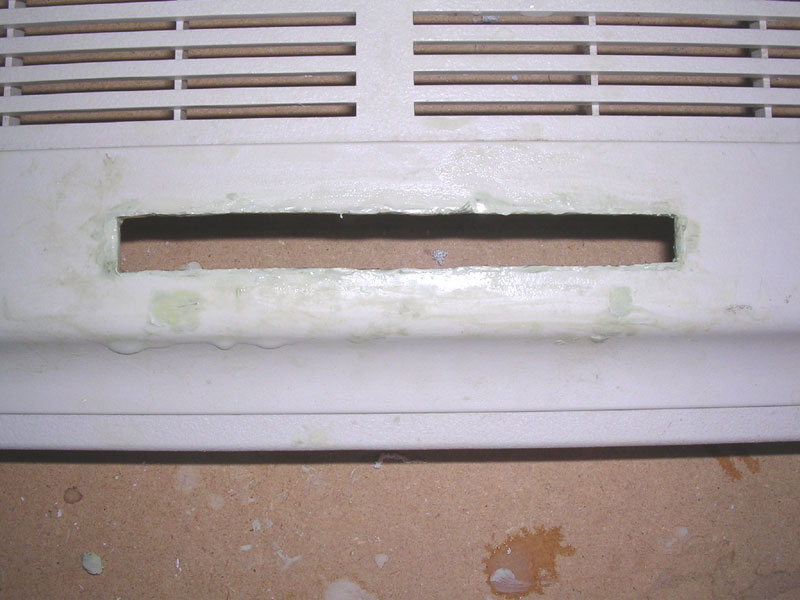 Working with Milliput isn't tricky once you know how it's going to act. It dries in phases, and what you do during those phases is important. When you first mix it (it's a two part mix) it's pliable and sticky. This is great for getting it to stay put in places where some putties might fall out or drip. In this phase, you can also wet it with a little water and smooth it with your finger or sculpting tool. This second picture shows the mulliput smoothed a little bit. My sculpting set it just a set of dental tools. The standard dental set has all the miniature sculpting tools you'll need and is relatively inexpensive.
In the second phase, after about 30 minutes (depends on temprature, but you can tell by poking it with your finger) it turns soft and rubbery. Kind of like taffy. It can now be cut with a hobby knife or razor for trimming off excess. You can also use a pick or sculting tool to poke holes or etch grooves in it.
The third phase, after about a day, the stuff turns pretty hard. About like porcelin. This is the time to sand it down if there's any light sanding to do. If you're dealing with a large piece, it can also be scored and broken at this point. You can do low impact/speed micro drilling in this phase as well.
Finally, after about three to seven days (again, depends on humidity and temperture), Mulliput turns rock hard. Once it's set up this hard, you can cut it with a cut off wheel or saw, and do heavy duty sanding on it. After a week or so, it's like working with stone. You can accelerate to all of these phases by heating it with a lamp or other moderate heat source.
 This final picture shows some of the tools used. In model making, this is what we call the "Ass Point." The point where the thing just looks like complete ass. This is where a lot of people give up because it's hard to see the finished project through the huge messy crap we've just spent a couple of hours making. No worries. Having been here many times before (some days I live in the ass point), I swere it'll work out. ;) When it's done, it'll look like it came from the factory that way. In the next step we'll attach a straght-edge to the case and position it as a fence to sand a nice straight and smooth edge around the cut out. We'll be using a micro file to sand down the edge by hand. More work, but a much nicer result.
When I cut the "big" windows, I'm going to try to get a finished cut right from the start. Haven't figured out how to do that yet, but I'm sure I'll come up with something. Also need an easier way to make smaller cuts in the case. I'm thinking the plunge router attachment on the Dremel tool and possibly a template is the best way, so we'll try that next. One of the points of this excercise it to experiment with techniques, and it certainly appears some experimentation is going to be required.
I did change the cut out design after I settled on a light kit. The light kit has a groovy green bar that'll fit under the CoCo 3 case badge that I've cut out. Since the power supply will be externalized, all the converters and other bits to power the lights (and anything else we can cram in there) will fit nicely in the power transformer's old spot. I can't promise I can afford it, but I'm going to see about getting the entire face plate copied to an etching for the plexiglass insert that will go in there. Would be very cool, but potentially cost prohibitive. We'll see.
Angel's Luck,
Capt.


No comments:
Post a Comment